SETTING YOUR WHITE BALANCE
So, on my beginners photography courses, we aim to get people out of the Auto shoot setting and using one of the harder settings, either Aperture mode (AV) or Shutter Speed mode (TV/S) or Manual Mode (M).
This gives users the control over how much they want in focus, how much they want to blur as well as getting sharp images if they are photographing a fast moving child / animal or sports for example.
Once people master this, their results are automatically improved.
However, before we even get to this point, we talk about the things people CAN keep on AUTO.
I completely understand, that for many people, the idea of having a camera is exciting but the reality is that there are a lot of buttons and settings that they have no clue about. As a result, when they start getting bad results, they panic and just put the camera away – too scary! Plus the manuals are LONG.
Well, this is the reason we go though the settings that we can effectively, ignore. So that people don’t feel as though they are missing something and not doing a good job.
But to ignore them, you have to understand what they do and why you can ignore them – and the why, is because we are going to keep them on auto and let then camera manage it for us.
THERE ARE THREE THINGS I SUGGEST YOU KEEP ON AUTO, ONE OF THESE IS WHITE BALANCE
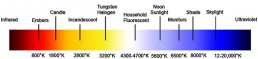
WHAT IS WHITE BALANCE?
White balance refers to the colour of the light recorded by the camera. Not all light is the same colour or what we call, temperature. Put very simply, some light is more blue in colour, some is white, some is yellow/orange. Midday sunlight, is what we would refer to as ‘normal’ in colour, where as a household light bulb, will be more orange and a cloudy day would render more blue.

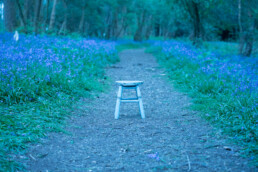
THE IMAGE ABOVE SHOWS HOW A LOVELY WHITE IMAGE CAN BE RUINED BY THE WHITE BALANCE BEING OFF
WHY IS WHITE BALANCE IMPORTANT?
When we take our pictures, there are many white balance settings that can account for these different conditions, and compensate for the different colours, to make the picture seem “normal” or neutral. For example, if you take a picture in a house with a lightbulb on, the light is very orange, so the camera will add more blue to compensate, likewise if you are taking a picture in a very shady spot outside, the camera will add more orange to compensate for the ‘cool’ temperature, or the blue.
MAKES SENSE, RIGHT?
The problem with these settings, if you don’t know that they are there, is that if you accidentally knock one, you end up with awful looking pictures as the camera uses that white balance setting, no matter what the colour of the light!
It is amazing how many people come to my courses with their white balance on a wrong setting, resulting in all of their images being blue, or yellow.
So we talk thorough it, and then explain that we need to make sure it is always on AUTO going forward until they get to the point that they want to set the colour manually as I do.
As you can see from the pictures below, the white balance settings I selected, really affected the colour and overall feel.
1) INCANDESCENT
The “blue” one was set on Incandescent (which is the lightbulb setting when you scroll through). This colour temp was around 2600K. You can see that because the camera thinks it has to compensate for lightbulb light (orange) it has included more blue in the picture, but because we don’t have the yellow/orange that it’s expecting the overall picture is blue.
2) DAYLIGHT
The next one was set to daylight, this is around 5050k. As you can see this is a nice white looking temperature. It is more of a neutral colour, however because it was a bit of a cloudy day, it was still quite cool.
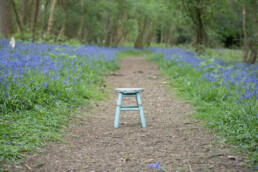
3) AUTO
The next image was taken using AUTO. In this instance, it has warmed the image up nicely, as I was out on a cloudy day but there was a lot of sky above and infront of us. This is definitely my preferred choice of white balance for this exercise.
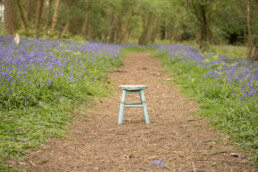
4) CLOUDY
The last image, was taken using the Cloudy setting. Here you can see the camera has added a lot more orange (As it thinks, rightly so that we are in a very cloudy place with lots of blue light). As a result, the image looks a lot warmer at around 10,500k.
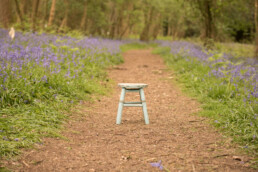
As you can see, Cloudy worked fine although it was ever so slightly too pinky/ orange in my opinion. Personally, I would have set it somewhere in-between the Cloudy and the Auto, because that’s my personal taste when it comes to the colour of my images.
However you would certainly not be disappointed with AUTO in this instance. It is 100% the best choice to use when you are trying to get to grips with your camera as it’s one less thing to worry about. Especially if you are outside on one of those days where the sun is coming in and out of the clouds.
And you can see, that if you knock your white balance onto the wrong setting without realising, that all of your pictures, whether inside, outside, sun or shade will be affected by the choice, and not represent what is actually needed.
To find your white balance settings, you will either need to press the button that says WB on the back of your camera and then across through the choices, or go to your menu or info display until you find it.
I hope you find this useful!